Newer
Older

1001
1002
1003
1004
1005
1006
1007
1008
1009
1010
1011
1012
1013
1014
1015
1016
1017
1018
1019
1020
1021
1022
1023
1024
1025
1026
1027
1028
1029
1030
1031
1032
1033
1034
1035
1036
1037
1038
1039
1040
1041
1042
1043
1044
1045
1046
1047
1048
1049
1050
1051
1052
1053
1054
1055
1056
1057
1058
1059
1060
1061
1062
1063
1064
1065
1066
1067
1068
1069
1070
1071
1072
1073
1074
1075
1076
1077
1078
1079
1080
1081
1082
1083
1084
1085
1086
1087
1088
1089
1090
1091
1092
1093
1094
1095
1096
1097
1098
1099
1100
1101
1102
1103
1104
1105
1106
1107
1108
1109
1110
1111
1112
1113
1114
1115
1116
1117
1118
1119
1120
1121
1122
1123
1124
1125
1126
1127
1128
1129
1130
1131
1132
1133
1134
1135
1136
1137
1138
1139
1140
1141
1142
1143
1144
1145
1146
1147
1148
1149
1150
1151
1152
1153
1154
1155
1156
1157
1158
1159
1160
1161
1162
1163
1164
1165
1166
1167
1168
1169
1170
1171
1172
1173
1174
1175
1176
1177
1178
1179
1180
1181
1182
1183
1184
1185
1186
1187
1188
1189
1190
1191
1192
1193
1194
1195
1196
1197
1198
1199
1200
1201
1202
1203
1204
1205
1206
1207
1208
1209
1210
1211
1212
1213
1214
1215
1216
1217
1218
1219
1220
1221
1222
1223
1224
1225
1226
1227
1228
1229
1230
1231
1232
1233
1234
1235
1236
1237
1238
1239
1240
1241
1242
1243
1244
1245
1246
1247
1248
1249
1250
1251
1252
1253
1254
1255
1256
1257
1258
1259
1260
1261
1262
1263
1264
1265
1266
1267
1268
1269
1270
1271
1272
1273
1274
1275
1276
1277
1278
1279
1280
1281
1282
1283
1284
1285
1286
1287
1288
1289
1290
1291
1292
1293
1294
1295
1296
1297
1298
1299
1300
1301
1302
1303
1304
1305
1306
1307
1308
1309
1310
1311
1312
1313
1314
1315
1316
1317
1318
1319
1320
1321
1322
1323
1324
1325
1326
1327
1328
1329
1330
1331
1332
1333
1334
1335
1336
1337
1338
1339
1340
1341
1342
1343
1344
1345
1346
1347
1348
1349
1350
1351
1352
1353
1354
1355
1356
1357
1358
1359
1360
1361
1362
1363
1364
1365
1366
1367
1368
1369
1370
1371
1372
1373
1374
1375
1376
1377
1378
1379
1380
1381
1382
1383
1384
1385
1386
1387
1388
1389
1390
1391
1392
1393
1394
1395
1396
1397
1398
1399
1400
1401
1402
1403
1404
1405
1406
1407
1408
1409
1410
1411
1412
1413
1414
1415
1416
1417
1418
1419
1420
1421
1422
1423
1424
1425
1426
1427
1428
1429
1430
1431
1432
1433
1434
1435
1436
1437
1438
### Overview mode
Press »ESC« or »O« keys to toggle the overview mode on and off. While you're in this mode, you can still navigate between slides,
as if you were at 1,000 feet above your presentation. The overview mode comes with a few API hooks:
```javascript
Reveal.addEventListener( 'overviewshown', function( event ) { /* ... */ } );
Reveal.addEventListener( 'overviewhidden', function( event ) { /* ... */ } );
// Toggle the overview mode programmatically
Reveal.toggleOverview();
```
### Fullscreen mode
Just press »F« on your keyboard to show your presentation in fullscreen mode. Press the »ESC« key to exit fullscreen mode.
### Embedded media
Add `data-autoplay` to your media element if you want it to automatically start playing when the slide is shown:
```html
<video data-autoplay src="http://clips.vorwaerts-gmbh.de/big_buck_bunny.mp4"></video>
```
If you want to enable or disable autoplay globally, for all embedded media, you can use the `autoPlayMedia` configuration option. If you set this to `true` ALL media will autoplay regardless of individual `data-autoplay` attributes. If you initialize with `autoPlayMedia: false` NO media will autoplay.
Note that embedded HTML5 `<video>`/`<audio>` and YouTube/Vimeo iframes are automatically paused when you navigate away from a slide. This can be disabled by decorating your element with a `data-ignore` attribute.
### Embedded iframes
reveal.js automatically pushes two [post messages](https://developer.mozilla.org/en-US/docs/Web/API/Window.postMessage) to embedded iframes. `slide:start` when the slide containing the iframe is made visible and `slide:stop` when it is hidden.
### Stretching elements
Sometimes it's desirable to have an element, like an image or video, stretch to consume as much space as possible within a given slide. This can be done by adding the `.stretch` class to an element as seen below:
```html
<section>
<h2>This video will use up the remaining space on the slide</h2>
<video class="stretch" src="http://clips.vorwaerts-gmbh.de/big_buck_bunny.mp4"></video>
</section>
```
Limitations:
- Only direct descendants of a slide section can be stretched
- Only one descendant per slide section can be stretched
### Resize Event
When reveal.js changes the scale of the slides it fires a resize event. You can subscribe to the event to resize your elements accordingly.
```javascript
Reveal.addEventListener( 'resize', function( event ) {
// event.scale, event.oldScale, event.size
} );
```
### postMessage API
The framework has a built-in postMessage API that can be used when communicating with a presentation inside of another window. Here's an example showing how you'd make a reveal.js instance in the given window proceed to slide 2:
```javascript
<window>.postMessage( JSON.stringify({ method: 'slide', args: [ 2 ] }), '*' );
```
When reveal.js runs inside of an iframe it can optionally bubble all of its events to the parent. Bubbled events are stringified JSON with three fields: namespace, eventName and state. Here's how you subscribe to them from the parent window:
```javascript
window.addEventListener( 'message', function( event ) {
var data = JSON.parse( event.data );
if( data.namespace === 'reveal' && data.eventName ==='slidechanged' ) {
// Slide changed, see data.state for slide number
}
} );
```
This cross-window messaging can be toggled on or off using configuration flags.
```javascript
Reveal.initialize({
// ...
// Exposes the reveal.js API through window.postMessage
postMessage: true,
// Dispatches all reveal.js events to the parent window through postMessage
postMessageEvents: false
});
```
## PDF Export
Presentations can be exported to PDF via a special print stylesheet. This feature requires that you use [Google Chrome](http://google.com/chrome) or [Chromium](https://www.chromium.org/Home) and to be serving the presentation from a web server.
Here's an example of an exported presentation that's been uploaded to SlideShare: http://www.slideshare.net/hakimel/revealjs-300.
### Separate pages for fragments
[Fragments](#fragments) are printed on separate slides by default. Meaning if you have a slide with three fragment steps, it will generate three separate slides where the fragments appear incrementally.
If you prefer printing all fragments in their visible states on the same slide you can set the `pdfSeparateFragments` config option to false.
### Page size
Export dimensions are inferred from the configured [presentation size](#presentation-size). Slides that are too tall to fit within a single page will expand onto multiple pages. You can limit how many pages a slide may expand onto using the `pdfMaxPagesPerSlide` config option, for example `Reveal.configure({ pdfMaxPagesPerSlide: 1 })` ensures that no slide ever grows to more than one printed page.
### Print stylesheet
To enable the PDF print capability in your presentation, the special print stylesheet at [/css/print/pdf.css](https://github.com/hakimel/reveal.js/blob/master/css/print/pdf.css) must be loaded. The default index.html file handles this for you when `print-pdf` is included in the query string. If you're using a different HTML template, you can add this to your HEAD:
```html
<script>
var link = document.createElement( 'link' );
link.rel = 'stylesheet';
link.type = 'text/css';
link.href = window.location.search.match( /print-pdf/gi ) ? 'css/print/pdf.css' : 'css/print/paper.css';
document.getElementsByTagName( 'head' )[0].appendChild( link );
</script>
```
### Instructions
1. Open your presentation with `print-pdf` included in the query string i.e. http://localhost:8000/?print-pdf. You can test this with [revealjs.com?print-pdf](http://revealjs.com?print-pdf).
* If you want to include [speaker notes](#speaker-notes) in your export, you can append `showNotes=true` to the query string: http://localhost:8000/?print-pdf&showNotes=true
1. Open the in-browser print dialog (CTRL/CMD+P).
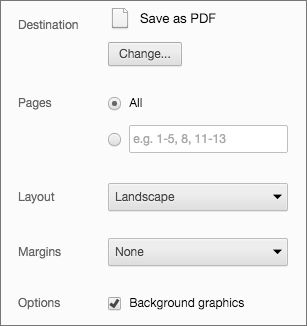
1. Change the **Destination** setting to **Save as PDF**.
1. Change the **Layout** to **Landscape**.
1. Change the **Margins** to **None**.
1. Enable the **Background graphics** option.
1. Click **Save**.
Alternatively you can use the [decktape](https://github.com/astefanutti/decktape) project.
## Theming
The framework comes with a few different themes included:
- black: Black background, white text, blue links (default theme)
- white: White background, black text, blue links
- league: Gray background, white text, blue links (default theme for reveal.js < 3.0.0)
- beige: Beige background, dark text, brown links
- sky: Blue background, thin dark text, blue links
- night: Black background, thick white text, orange links
- serif: Cappuccino background, gray text, brown links
- simple: White background, black text, blue links
- solarized: Cream-colored background, dark green text, blue links
Each theme is available as a separate stylesheet. To change theme you will need to replace **black** below with your desired theme name in index.html:
```html
<link rel="stylesheet" href="css/theme/black.css" id="theme">
```
If you want to add a theme of your own see the instructions here: [/css/theme/README.md](https://github.com/hakimel/reveal.js/blob/master/css/theme/README.md).
## Speaker Notes
reveal.js comes with a speaker notes plugin which can be used to present per-slide notes in a separate browser window. The notes window also gives you a preview of the next upcoming slide so it may be helpful even if you haven't written any notes. Press the »S« key on your keyboard to open the notes window.
A speaker timer starts as soon as the speaker view is opened. You can reset it to 00:00:00 at any time by simply clicking/tapping on it.
Notes are defined by appending an `<aside>` element to a slide as seen below. You can add the `data-markdown` attribute to the aside element if you prefer writing notes using Markdown.
Alternatively you can add your notes in a `data-notes` attribute on the slide. Like `<section data-notes="Something important"></section>`.
When used locally, this feature requires that reveal.js [runs from a local web server](#full-setup).
```html
<section>
<h2>Some Slide</h2>
<aside class="notes">
Oh hey, these are some notes. They'll be hidden in your presentation, but you can see them if you open the speaker notes window (hit »S« on your keyboard).
</aside>
</section>
```
If you're using the external Markdown plugin, you can add notes with the help of a special delimiter:
```html
<section data-markdown="example.md" data-separator="^\n\n\n" data-separator-vertical="^\n\n" data-separator-notes="^Note:"></section>
# Title
## Sub-title
Here is some content...
Note:
This will only display in the notes window.
```
#### Share and Print Speaker Notes
Notes are only visible to the speaker inside of the speaker view. If you wish to share your notes with others you can initialize reveal.js with the `showNotes` configuration value set to `true`. Notes will appear along the bottom of the presentations.
When `showNotes` is enabled notes are also included when you [export to PDF](https://github.com/hakimel/reveal.js#pdf-export). By default, notes are printed in a box on top of the slide. If you'd rather print them on a separate page, after the slide, set `showNotes: "separate-page"`.
#### Speaker notes clock and timers
The speaker notes window will also show:
- Time elapsed since the beginning of the presentation. If you hover the mouse above this section, a timer reset button will appear.
- Current wall-clock time
- (Optionally) a pacing timer which indicates whether the current pace of the presentation is on track for the right timing (shown in green), and if not, whether the presenter should speed up (shown in red) or has the luxury of slowing down (blue).
The pacing timer can be enabled by configuring by the `defaultTiming` parameter in the `Reveal` configuration block, which specifies the number of seconds per slide. 120 can be a reasonable rule of thumb. Timings can also be given per slide `<section>` by setting the `data-timing` attribute. Both values are in numbers of seconds.
## Server Side Speaker Notes
In some cases it can be desirable to run notes on a separate device from the one you're presenting on. The Node.js-based notes plugin lets you do this using the same note definitions as its client side counterpart. Include the required scripts by adding the following dependencies:
```javascript
Reveal.initialize({
// ...
dependencies: [
{ src: 'socket.io/socket.io.js', async: true },
{ src: 'plugin/notes-server/client.js', async: true }
]
});
```
Then:
1. Install [Node.js](http://nodejs.org/) (4.0.0 or later)
2. Run `npm install`
3. Run `node plugin/notes-server`
## Plugins
Plugins should register themselves with reveal.js by calling `Reveal.registerPlugin( 'myPluginID', MyPlugin )`. Registered plugin instances can optionally expose an "init" function that reveal.js will call to initialize them.
When reveal.js is booted up via `Reveal.initialize()`, it will go through all registered plugins and invoke their "init" methods. If the "init" method returns a Promise, reveal.js will wait for that promise to be fullfilled before finshing the startup sequence and firing the [ready](#ready-event) event. Here's an example of a plugin that does some asynchronous work before reveal.js can proceed:
```javascript
let MyPlugin = {
init: () => new Promise( resolve => setTimeout( resolve, 3000 ) )
};
Reveal.registerPlugin( 'myPlugin', MyPlugin );
Reveal.addEventListener( 'ready', () => console.log( 'Three seconds later...' ) );
Reveal.initialize();
```
If the init method does _not_ return a Promise, the plugin is considered ready right away and will not hold up the reveal.js startup sequence.
### Retrieving Plugins
If you want to check if a specific plugin is registered you can use the `Reveal.hasPlugin` method and pass in a plugin ID, for example: `Reveal.hasPlugin( 'myPlugin' )`. If you want to retrieve a plugin instance you can use `Reveal.getPlugin( 'myPlugin' )`.
## Multiplexing
The multiplex plugin allows your audience to view the slides of the presentation you are controlling on their own phone, tablet or laptop. As the master presentation navigates the slides, all client presentations will update in real time. See a demo at [https://reveal-js-multiplex-ccjbegmaii.now.sh/](https://reveal-js-multiplex-ccjbegmaii.now.sh/).
The multiplex plugin needs the following 3 things to operate:
1. Master presentation that has control
2. Client presentations that follow the master
3. Socket.io server to broadcast events from the master to the clients
#### Master presentation
Served from a static file server accessible (preferably) only to the presenter. This need only be on your (the presenter's) computer. (It's safer to run the master presentation from your own computer, so if the venue's Internet goes down it doesn't stop the show.) An example would be to execute the following commands in the directory of your master presentation:
1. `npm install node-static`
2. `static`
If you want to use the speaker notes plugin with your master presentation then make sure you have the speaker notes plugin configured correctly along with the configuration shown below, then execute `node plugin/notes-server` in the directory of your master presentation. The configuration below will cause it to connect to the socket.io server as a master, as well as launch your speaker-notes/static-file server.
You can then access your master presentation at `http://localhost:1947`
Example configuration:
```javascript
Reveal.initialize({
// other options...
multiplex: {
// Example values. To generate your own, see the socket.io server instructions.
secret: '13652805320794272084', // Obtained from the socket.io server. Gives this (the master) control of the presentation
id: '1ea875674b17ca76', // Obtained from socket.io server
url: 'https://reveal-js-multiplex-ccjbegmaii.now.sh' // Location of socket.io server
},
// Don't forget to add the dependencies
dependencies: [
{ src: '//cdnjs.cloudflare.com/ajax/libs/socket.io/2.2.0/socket.io.js', async: true },
{ src: 'plugin/multiplex/master.js', async: true },
// and if you want speaker notes
{ src: 'plugin/notes-server/client.js', async: true }
// other dependencies...
]
});
```
#### Client presentation
Served from a publicly accessible static file server. Examples include: GitHub Pages, Amazon S3, Dreamhost, Akamai, etc. The more reliable, the better. Your audience can then access the client presentation via `http://example.com/path/to/presentation/client/index.html`, with the configuration below causing them to connect to the socket.io server as clients.
Example configuration:
```javascript
Reveal.initialize({
// other options...
multiplex: {
// Example values. To generate your own, see the socket.io server instructions.
secret: null, // null so the clients do not have control of the master presentation
id: '1ea875674b17ca76', // id, obtained from socket.io server
url: 'https://reveal-js-multiplex-ccjbegmaii.now.sh' // Location of socket.io server
},
// Don't forget to add the dependencies
dependencies: [
{ src: '//cdnjs.cloudflare.com/ajax/libs/socket.io/2.2.0/socket.io.js', async: true },
{ src: 'plugin/multiplex/client.js', async: true }
// other dependencies...
]
});
```
#### Socket.io server
Server that receives the `slideChanged` events from the master presentation and broadcasts them out to the connected client presentations. This needs to be publicly accessible. You can run your own socket.io server with the commands:
1. `npm install`
2. `node plugin/multiplex`
Or you can use the socket.io server at [https://reveal-js-multiplex-ccjbegmaii.now.sh/](https://reveal-js-multiplex-ccjbegmaii.now.sh/).
You'll need to generate a unique secret and token pair for your master and client presentations. To do so, visit `http://example.com/token`, where `http://example.com` is the location of your socket.io server. Or if you're going to use the socket.io server at [https://reveal-js-multiplex-ccjbegmaii.now.sh/](https://reveal-js-multiplex-ccjbegmaii.now.sh/), visit [https://reveal-js-multiplex-ccjbegmaii.now.sh/token](https://reveal-js-multiplex-ccjbegmaii.now.sh/token).
You are very welcome to point your presentations at the Socket.io server running at [https://reveal-js-multiplex-ccjbegmaii.now.sh/](https://reveal-js-multiplex-ccjbegmaii.now.sh/), but availability and stability are not guaranteed.
For anything mission critical I recommend you run your own server. The easiest way to do this is by installing [now](https://zeit.co/now). With that installed, deploying your own Multiplex server is as easy running the following command from the reveal.js folder: `now plugin/multiplex`.
##### socket.io server as file static server
The socket.io server can play the role of static file server for your client presentation, as in the example at [https://reveal-js-multiplex-ccjbegmaii.now.sh/](https://reveal-js-multiplex-ccjbegmaii.now.sh/). (Open [https://reveal-js-multiplex-ccjbegmaii.now.sh/](https://reveal-js-multiplex-ccjbegmaii.now.sh/) in two browsers. Navigate through the slides on one, and the other will update to match.)
Example configuration:
```javascript
Reveal.initialize({
// other options...
multiplex: {
// Example values. To generate your own, see the socket.io server instructions.
secret: null, // null so the clients do not have control of the master presentation
id: '1ea875674b17ca76', // id, obtained from socket.io server
url: 'example.com:80' // Location of your socket.io server
},
// Don't forget to add the dependencies
dependencies: [
{ src: '//cdnjs.cloudflare.com/ajax/libs/socket.io/2.2.0/socket.io.js', async: true },
{ src: 'plugin/multiplex/client.js', async: true }
// other dependencies...
]
```
It can also play the role of static file server for your master presentation and client presentations at the same time (as long as you don't want to use speaker notes). (Open [https://reveal-js-multiplex-ccjbegmaii.now.sh/](https://reveal-js-multiplex-ccjbegmaii.now.sh/) in two browsers. Navigate through the slides on one, and the other will update to match. Navigate through the slides on the second, and the first will update to match.) This is probably not desirable, because you don't want your audience to mess with your slides while you're presenting. ;)
Example configuration:
```javascript
Reveal.initialize({
// other options...
multiplex: {
// Example values. To generate your own, see the socket.io server instructions.
secret: '13652805320794272084', // Obtained from the socket.io server. Gives this (the master) control of the presentation
id: '1ea875674b17ca76', // Obtained from socket.io server
url: 'example.com:80' // Location of your socket.io server
},
// Don't forget to add the dependencies
dependencies: [
{ src: '//cdnjs.cloudflare.com/ajax/libs/socket.io/2.2.0/socket.io.js', async: true },
{ src: 'plugin/multiplex/master.js', async: true },
{ src: 'plugin/multiplex/client.js', async: true }
// other dependencies...
]
});
```
## MathJax
If you want to display math equations in your presentation you can easily do so by including this plugin. The plugin is a very thin wrapper around the [MathJax](http://www.mathjax.org/) library. To use it you'll need to include it as a reveal.js dependency, [find our more about dependencies here](#dependencies).
The plugin defaults to using [LaTeX](http://en.wikipedia.org/wiki/LaTeX) but that can be adjusted through the `math` configuration object. Note that MathJax is loaded from a remote server. If you want to use it offline you'll need to download a copy of the library and adjust the `mathjax` configuration value.
Below is an example of how the plugin can be configured. If you don't intend to change these values you do not need to include the `math` config object at all.
```js
Reveal.initialize({
// other options ...
math: {
mathjax: 'https://cdnjs.cloudflare.com/ajax/libs/mathjax/2.7.0/MathJax.js',
config: 'TeX-AMS_HTML-full' // See http://docs.mathjax.org/en/latest/config-files.html
// pass other options into `MathJax.Hub.Config()`
TeX: { Macros: macros }
},
dependencies: [
{ src: 'plugin/math/math.js', async: true }
]
});
```
Read MathJax's documentation if you need [HTTPS delivery](http://docs.mathjax.org/en/latest/start.html#secure-access-to-the-cdn) or serving of [specific versions](http://docs.mathjax.org/en/latest/configuration.html#loading-mathjax-from-the-cdn) for stability.
#### MathJax in Markdown
If you want to include math inside of a presentation written in Markdown you need to wrap the formula in backticks. This prevents syntax conflicts between LaTeX and Markdown. For example:
```
`$$ J(\theta_0,\theta_1) = \sum_{i=0} $$`
```
## License
MIT licensed
Copyright (C) 2019 Hakim El Hattab, http://hakim.se